Archived Cleaning Blog Posts
The Ultimate Fall Yard Cleanup & Maintenance Checklist
9/16/2019 (Permalink)
As summer comes to a close, you might be thinking about hanging up the lawn care tools until spring rolls back around. But surprisingly, autumn is the ideal season to prepare your lawn for the chilly months ahead. In fact, if you put in the time to care for and clean up your yard this fall, you’ll be greeted by a lush and green lawn come springtime.
So, what sort of TLC does your yard need now to look its best next year? Follow our fall yard cleanup and maintenance checklist to learn everything you need to know.
1. Remove Any Debris
As the trees shed their foliage, you’ll want to rake regularly to help remove dead leaves and other debris that will smother the grass and prevent growth. Organic waste like leaves and weeds can provide a haven for pests like mice and groundhogs. In addition to having little critters running in your yard, excessive yard debris can cause damage to your yard’s drainage, which can cause a problem once all the snow melts.
Here a few fall yard cleanup tips to help you keep your leaf piles under control:
Best Ways to Remove Leaves from Yard
- Use a Tarp: Rake all your leaves onto a tarp for easier hauling to the curb or compost pile.
- Rake into Rows: If you’re bagging your leaves, it’s better to rake them into rows instead of piles. The leaves can be separated into more manageable portions at the end of the row.
- Use Leaves as Lawn Fertilizer: Before the snow starts to fall, you can run your lawn mower over the fallen leaves to shred them into tiny flakes. They will settle into the autumn grass and decompose into natural fertilizer.
Not sure what to do with all that natural debris?
Learn how to get rid of leaves and yard waste.
2. Take Out Dead Shrubs and Trees
Now that a full season of sunshine has passed, have you noticed any shrubs in your yard that didn’t seem to grow the way you had hoped? Check for signs of life by scratching the bark at the base to see if there is any green under there. If no green appears under the bark, it might be dead.
If the tree or shrub is completely dead, it’s best to cut it down and dig it out before the ground hardens. But you don’t have to mourn for too long – fall is a great time to plant trees and shrubs for maximum growth.
Tips for Cleaning Out Dead Trees and Shrubs in the Fall
- Cut Your Tree During the Dormant Season: Once the leaves have fallen off during late fall and early winter, it is much easier for arborist to cut and handle. The hard ground during the colder season will help ensure other trees and shrubs stay in place.
- Don’t Do It All in One Day: There’s no need to rush your fall yard cleanup. Just as seasons change slowly, you should also take it slow and avoid trying to clean everything up in one day.
- Rent a Dumpster: Planning a full landscaping overhaul? Using a roll off dumpster to dispose of large branches, stumps, bushes and other bulky yard debris is a lot easier than hauling them to the dump yourself.
3. Don’t Stop Mowing Just Yet
Fall yard maintenance is all about helping your lawn finish strong so that it can withstand the bitter temperatures ahead. It’s important to continue watering and mowing your lawn as needed. Once the season draws to a close and the temperature begins to drop, you should set your mower’s blades to their lowest setting for the last two cuts of the season. This will allow more sunlight to reach the crown of the grass and allow the soil to dry out faster in the spring.
Pro Fall Yard Care Tip: Only cut your grass if it is still growing. Once the temperatures consistently drop below 50 degrees during the day, it’s time to put away the mower for the season.
4. Aerate the Lawn
Aerating your lawn can remove thatch, alleviate soil compaction and beautify your grass overall. Having excess thatch or heavy organic debris under the grassy surface can starve the roots from essential elements like air and water. Experts say the best time to aerate your lawn is in the fall during the growing season. Grass can heal and fill open areas more quickly once soil plugs are removed.
The easiest way to aerate your lawn is to purchase or rent a gas-powered aerator from your local hardware store. Smaller lawns can be aerated using spiked lawn aerator shoes, but for lawns bigger than three acres, you might want to hire a landscaper instead of spending an entire afternoon digging holes yourself.
Pro Fall Yard Care Tip: Aerate and seed your lawn early in the fall with cool-weather grass seed to take advantage of the warmer soil. Overseed and overwater your lawn to maximize the aeration process and give your new grass a quick kickstart.
5. Add Fertilizer
There is no better feeling than strolling around your neighborhood with a sense of pride knowing that your grass is the greenest and lushest of them all. Accomplishing this feat does not come easy and requires some additional ingredients beyond just water and sunshine. Fall’s cooler temperatures and morning dew provide the perfect setting to fertilize your lawn to regain strength from the stressful summer heat.
“Fall is the best time to fertilize as it helps your lawn develop a stronger root system over the winter months for a thicker, more vigorous lawn the following spring. Watering is optional [after fertilizing], but it will activate the fertilizer and begin the feeding process. You can simply wait until the next rainfall, unless your daytime temperatures will exceed 85 degrees. If temperatures are extremely high, we do recommend watering immediately after application.”
6. Mulch Around Plants and Trees
Mulching around plants in the fall season has all kinds of benefits, from preventing soil erosion to suppressing weeds. Be sure to give perennials and cool-weather annuals a 2 to 3-inch layer of mulch to keep them healthy during the cold season. Applying mulch in the fall can also act as a weed suppressant, leaving you with no weeds to pull in the spring.
Pro Fall Yard Care Tip: Save money by using organic mulches like pine needles, straw, sawdust, fallen leaves, and grass clippings to introduce essential nutrients into the soil.
7. Rake Over Bald Spots
Is your lawn looking a little patchy? Fall is also a great time to handle any bare, bald spots on your lawn. The easiest way to handle the dead areas in your lawn is to pick up an all-in-one lawn repair mixture from your local home improvement or lawn care store. This solution usually contains a mixture of grass seed, fertilizer, and organic mulch.
8. Don’t Forget About Garden Maintenance
Caring for your garden in the fall will make all the difference when you go to plant your produce in the spring again. Before the cold temperatures harden the ground, remove all weeds and debris to eliminate enticing homes for insects and diseases in the winter. Water your garden plants diligently and they will be thanking you all winter long. You might want to consider trimming perennial vegetables and herbs back a few inches once the ground is frozen.
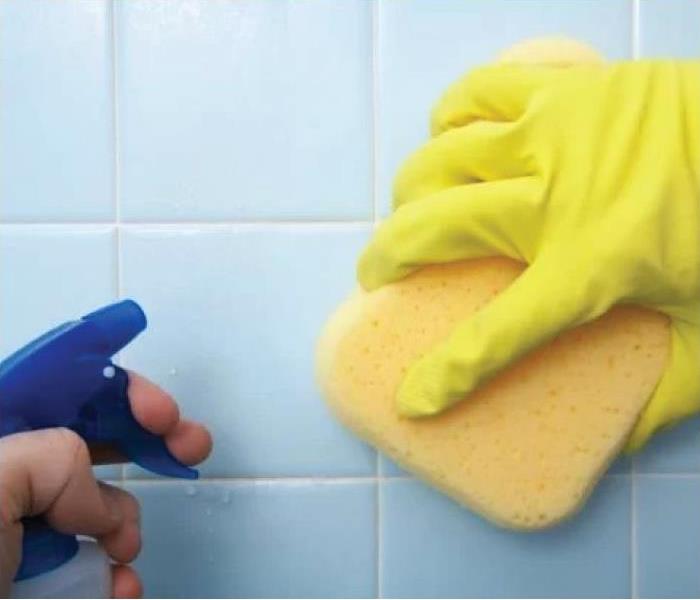
The Best Bathroom Cleaners for Every Surface
9/3/2019 (Permalink)
Consider these factors as you read the labels of bathroom cleaners.
Suitability for cleaning surface.
You’ll find bathroom cleaners in two varieties:
- Multipurpose cleaners can be applied to a wide range of bathroom surfaces from showers and tubs to mirrors because they’re formulated for use on multiple materials. They’re the most versatile and budget-friendly option because you need only buy one cleaner for the whole bathroom.
- Dedicated cleaners are formulated (and labeled) for use only on specific surfaces, such as toilet bowls or showers; using them elsewhere could tarnish or corrode other materials. They’re a good option for deep-cleaning a targeted area.
That said, it’s perhaps more important to select a product labeled for use on the specific material you’ll be cleaning.
- For toilets, bathroom cleaners should be labeled as safe for use on porcelain.
- For mirrors, choose products for use on glass.
- For countertops, cleaners should specify that they’re safe on laminate, natural stone (e.g., granite or marble), engineered stone (e.g., quartz), or ceramic tile.
- For sinks, cleaners should be compatible with sink basin materials (e.g., porcelain or acrylic) and faucet materials (e.g., chrome or brass).
- For tubs and showers, select cleaners meant for use on porcelain, ceramic tile, vinyl, or natural stone.
5 Benefits of Cleaning Your Air Ducts
3/13/2019 (Permalink)
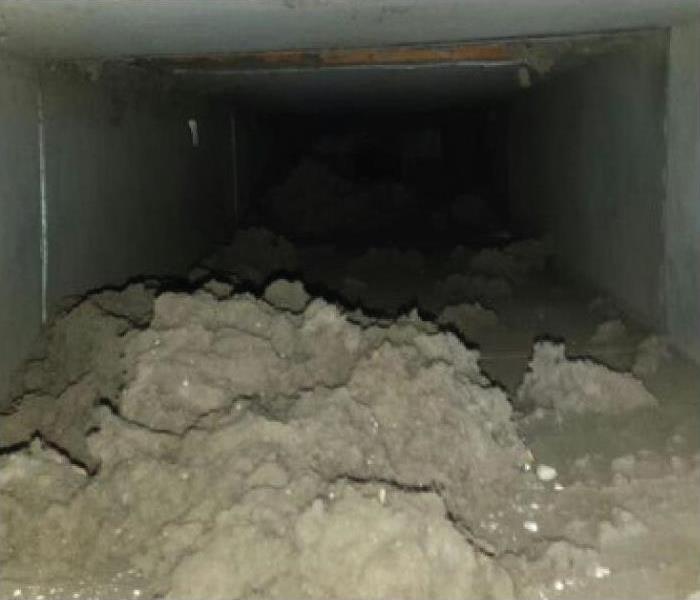 What are you breathing in?
The air ducts in your home have a very important job. They circulate the air flow from your heating and cooling equipment throughout your home to ensure it is properly conditioned at all times. And this occurs multiple times every day.
But it’s not just the warmth or coolness that impacts you and your family; it impacts the air you breathe as well. How many hours do you spend inside? 10? 12? And that’s every day.
It’s important to ensure it is as clean as possible.
Air duct cleaning involves removing the dust and contaminants that exist within the ductwork. This includes all areas of the system, including the supply and return air ducts as well as the registers in each room. Air duct cleaning involves powerful vacuums that pull dust and debris from deep within, preventing it from moving and circulating throughout your home.
If you’ve never had your ducts cleaned before, now may be a perfect time. There are many benefits to duct cleaning, including:
Creating a cleaner living environment
Like everything in your home, dust can start to settle in your ductwork after just a few hours of non-movement. And when the system powers up, that dust begins to move. But it doesn’t just stay in the ductwork, it comes out and into your living environment, settling on your furniture, your bedding, your flooring. By removing the dust from within, you’ll make your home a cleaner place to live.
Improving your air quality
Take a deep breath. How clean is the air you are breathing? Even if no one in your home suffers from allergies or respiratory conditions, cleaner air helps keep you healthier overall. Every time you breathe in dust and pollutants, they have the potential to trigger sneezing and coughing, as well as impact your sinuses or bronchial congestion. Cleaning your air ducts regularly ensures you’ll always have a clean air supply to breathe in.
Reducing irritants in the air
Let’s face it, it’s not just dust that lurks in your air ducts. Harmful contaminants and microorganisms live there too. Pet dander, bacteria, pollen, mildew, and other pollutants can all impact the air you breathe. A periodic air duct cleaning helps keep the family members in your home healthier instead or circulating potential problems over and over again.
Removing smells and odors
Every home has its own unique smell. And sometimes it isn’t the most pleasant thing. Pets, cleaning agents, paint fumes, mildew, food, tobacco use, and more all contribute to stale smells that can settle in over time. A detailed cleaning of the air ducts can help remove odor that is trapped in dust particles, giving you a fresher smelling home.
Improving efficiency
When ductwork and registers have a heavy buildup of dust and grime, they may not operate as efficiently as possible. When the air supply is cut off in any capacity, it means your system has to work harder to accomplish the same outcome. A cleaner system is designed to operate as efficiently as possible, giving you a system that operates at peak efficiency and provides cost-effective performance year round.
Call us for an estimate!
6 Tips for Spring Cleaning
3/8/2019 (Permalink)
Spring is right around the corner. The flowers are blooming, the birds are serenading, and our house still feels like it's stuck with winter blues. Spring cleaning is a tradition that allows us to freshen up our homes and get a head start on the hectic seasons of spring and summer.
Clean Room-By-Room
Approaching your house room-by-room is the most effective way to deep-clean your home at any time of the year, but especially in spring. Use room checklists as a springboard for deep-cleaning the areas of your home that really need extra attention. Feel free to skip items that have recently been cleaned and focus on the parts of your home that have been neglected all winter long.
Organize and Clear the Clutter
One of the biggest parts of spring cleaning is getting rid of clutter that you don't need. Now is a good time to advantage of the natural spring urge to get rid of items that are weighing you down and begin fresh with a more streamlined lifestyle. A systematic four-step approach to identifying problems, analyzing reasons, determining solutions, and implementing remedies can be extremely productive at this time of year. Sorting your belongings into four categories—trash, give-away, store, or put-way—can also be effective as you begin the spring-cleaning process.
Now is a great time to plan a garage sale or to donate items to good causes. Cleaning will be a lot easier when the clutter is gone.
Get the Family Involved
If you need a little help in your cleaning endeavors, get your family involved. Even the most unwilling helper can make a big difference in the workload. Don't worry: There are ways to deal with even the most reluctant helpers. This is actually a great time of year to get the entire family to work together. Try throwing on some music or establishing a family reward as an incentive to get the work done.
Tackle the Seasonal Chores
There are some special chores that need to be done seasonally. We ignore them for most of the fall and winter, but now it is time to bite the bullet and get these things clean. Even though these chores only need to be done once or twice a year, they will help your home run look better and run smoothly. Outdoor chores like cleaning grills, patios, and windows can be a little intimidating, but there are some simple tricks that can keep the jobs manageable.
Keep Cleaning Products to a Minimum
The cleaning aisles of our stores are stocked full of commercial products to help you clean, but the variety can be overwhelming. And dozens of cleaning products means dozens of cleaning products to clutter up your cabinets and closets.
Resist the temptation to buy all these cleaning supplies; the real champions of spring cleaning are more basic supplies, such as a good all-purpose cleaner and microfiber cloths. There are even homemade cleaners you can make that will save you money while protecting the environment.
Establish New Cleaning Habits
A good, thorough spring cleaning that includes the whole house is a great time to establish new on-going cleaning habits, and it can also make the next spring cleaning a good deal easier. Simple 15-minute cleanup routines practiced every few days, each including a series of 1- to 2-minute chores, can make it remarkably easy to keep your home clean and tidy all year long.


 24/7 Emergency Service